Friday, December 30, 2011

A DIY Stable for Christmas...


Hello Sisters!!! I know it's been a very very long time!!! All of my "sisters" are doing well and we all hope you have had a wonderful Christmas!!! I know my little girls did. It is so exciting to see them open all their gifts for Christmas. 
This year my little L is in LOVE with horses. Especially 'My Little Pony' horses. And I don't mean the ones they sell at the store today. A while ago I unpacked my huge containter of My Little Ponies that I had when I was growing up..you know..the REAL ones!!! She was instantly in love with them and whenever we go out she chooses a special horse to accompany her. A few months ago I asked her what she wanted for Christmas and she told me a stable...for all her horses. Well, this poses a delima for me because I can sew, crochet, modpodge, etc, etc...but I can not build anything from wood! Oy! What was I to do! So this is when I asked my Dad...who can build ANYTHING...to help me. I told him that L wanted a stable for her My Little Ponies for Christmas and let it be his special gift to her. My dad designed and built it for her and it turned out absolutly beautiful! I can't even begin to express how thankful I am for my dad and all the things he does for my little girls. He's amazing! After my dad finished the project he sent me the detailed instructions with pictures of the whole process. All I know is that this was such a special gift for Leia and I know it is something that will be forever treasured by my little girl and passed on through the generations! I Love you Dad!

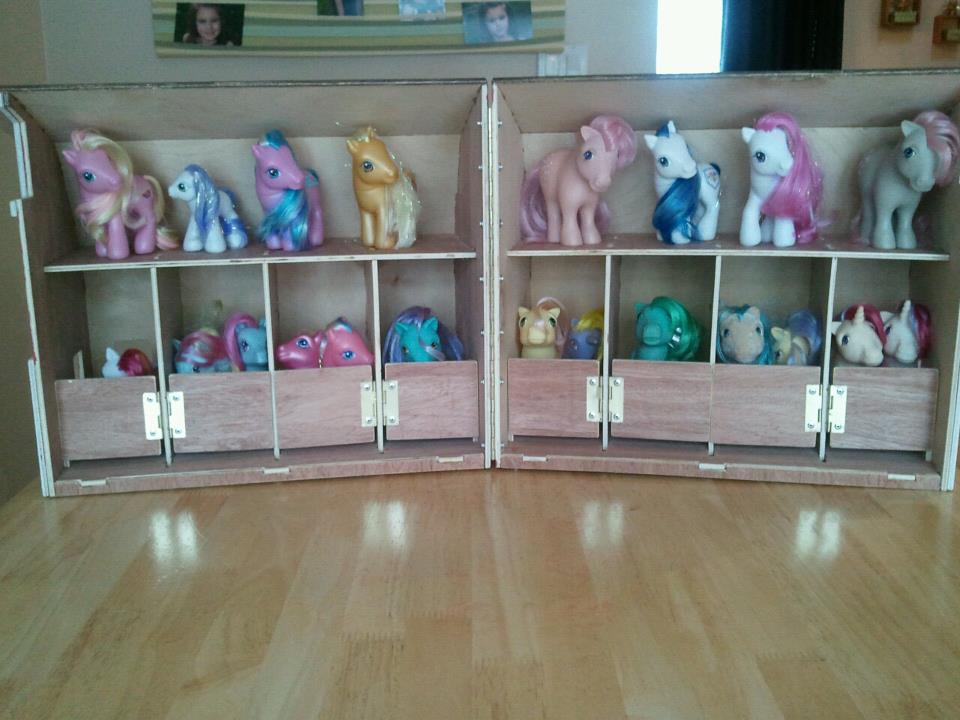
A few pictures of the finished project:


Her Ponies have found a new home!


(And now introducing my Dad :)
A Stable Project 


I was asked by my daughter to make a stable for my granddaughter as a Christmas gift. She loves horses and needed a place to play and store them. So I needed a design that would be easy to use and store away. I still had the plans to a barn I built in our backyard, so I used them as a starting point. So I scaled them down and drew in the additions needed to make a stable. Using all outside dimensions I laid out all of the parts onto a sheet of 1/4" thick Luan plywood. The reason for using all of the outside dimensions is to create slot and tab locations in the edges of the parts in order to have them self-fit together. This is the same thing they do for doll houses. Then I drew in all of the corresponding slots and tabs between all of the pieces and cut them out on a band saw and router, you can also use a table saw and then cut the slots and tabs using a router or hand saw. Once all of the pieces are completed, I drew in where I needed to use hinges for the stall gates. The stable was designed and built in two halves so that it will open and close in the middle. This enables full access to all of the stalls and when closed, stores all of the horses. 
After all of the parts were sanded and painted it was time to assemble all of the parts. Be careful when assembling not to glue yourself into a corner as I almost did, test fit the pieces together to insure the correct gluing sequence. Then present your finished project and watch the smiles.

Plans:

Cut out all your pieces:
Make sure they fit together and attach stable doors:
 Attach the hinges to the back of the stable so it will open up:
Once you know it all fits together, take it apart and paint it:
Re-assemble and glue together. Glue on shingles if using:
(my dad made his own shingles but doll house shingles work as well and can be
picked up at local craft stores or online)
Admire your work:
Precious Moment:
A Marvelous Mess
The Girl CreativeThe DIY Show Off
Fun Stuff Fridays

Thursday, October 27, 2011

we're still here ♥

it's been a long time....we know
sometimes life gets crazy, no?
new babies...
babies (still seems like :) starting school...
school projects...
projects for the holidays that are upon us....

we still ♥ you sisters...
we're still here...
you have put gladness in our ♥'s  ...psalm 4.7


Monday, September 26, 2011

have I mentioned how much I LOVE free patterns....


I can't believe how fast September has flown by! It seems like everything in my life falls in the month of September! It has been insane in my household this month. With L starting school, lots of birthdays, and my husband and I taking over the director portion of our K-2nd grade Awana program at church. I think I need a vacation from the month of September! But thankfully we survived!!! :) And I think I'm finally starting to get used to my little L going to kindergarten every day, even though I miss her like crazy! 

And.. I even found time to sew a dress!!! Go figure!! I love looking on pinterest for free sewing patterns there are so many out there and they are all adorable. I found the pattern for this dress HERE. I am no expert at sewing and I thought this was a very good and easy pattern to follow. 


Here are some of my other Pinterest Favorites


Come and see tons of other great ideas on Pinterest
Follow Me on Pinterest
Click HERE to follow me on Pinterest

The DIY Show Off


The Girl Creative


A Marvelous Mess


Friday, September 16, 2011

Wash Day, Ironing Day, Cleaning Day...

Happy Friday friends! Ever since the kiddos started back to school last week, I have been trying to steer myself onto the road of organization and cleaning. And let my tell you, sisters, that road isn't always smooth. I sit here and ponder...why can I not keep my house picked up and company ready? The desire is there...what is the problem? I figured out that I am very easily distracted (something shiny?? Where?) If I even sit down at this stinkin' computer in the morning, hours can easily slip away! (Pinterest anyone?) I also L.O.V.E. to read. I will sometimes bribe myself by "allowing" myself to read my book for 30 minutes if I do this, this and this first.
Anyway, I have become slightly obsessed (in a good way) with the idea of  a chore for every day. It worked generations ago...I think it went something like...Monday was wash day (because it was such hard work and you would be all rested up from Sunday), Tuesday was ironing day (because all the wash was clean, makes sense), Wednesday was sewing day (maybe you noticed all the things that need mending while you ironed?), Thursday was market day (did this take all day cause they had to walk to the market?...uphill?...both ways?), Friday was cleaning (I guess that was bound to come along eventually), Saturday was baking day (now that sounds fun!) and then Sunday was a day to rest (Amen!).
My Great Grandma had embroidered towels that showed the daily chores. They were so fun to look at when I was little. (I was probably distracted by the neat towels whilst I was supposed to be doing a chore!) I found these kitty "chore of the day" kitchen towels on Etsy...so cute!


I am still trying to iron out (haha) the best cleaning/chore schedule, but Mondays have become the day that I change all the sheets. Is it bad that I never had a set day to do this before? Does everyone change sheets once a week? Is that normal or excessive? Please advise. 
I really do love the feel of clean sheets...so nice...but changing them is for the birds! My son has bunk beds (I always wack my head) and my daughter has an extreme amount of pillows on her bed. We really aren't sure how she fits in the bed with all those pillows.


Here is my sheet changing "supervisor".  A big black kitty known as Oreo. He loves to lay on the bed as you're trying to make it, right in the way, getting all tangled up in blankets and sheets. Fabulous.


Last spring I cleaned out and organized my linen closet. No, I am not showing any before and after pictures 'cause it is my own stupid fault that there even was a "before" and it really wasn't pretty. ☺ I started using a tip from Martha Stewart about putting each folded sheet set into its pillowcase so the sets stay nicely organized and together. It seems to be working...I haven't had to search the closet for a matching pillowcase in months!


Ummm...that is Martha's linen closet, well one of them at least, not mine. Actually, that probably isn't even Martha's closet. That there, is probably a stunt closet set up to make the rest of us feel envious! And it totally worked!
So, here is the funny part of my sheet changing day...I was watching Giada make something totally yummy on the food channel while I did my bed and I got the bed all put back together...blanket, comforter, pillows. Everything was tucked and straight and looking nice, I turn to walk out of the bedroom and there is the folded top sheet laying on the floor! I never put it on, dang it! I had to rip everything off again. See, I told you...easily distracted!

Have a good week, think of me as you wash and fold those sheets!

Wednesday, September 14, 2011

what to get when you don't know what to get

It's been mentioned in previous posts that here at 7Sisters we are doing our best to stay on top of the holidays this year!  I have to say that's definitely true for myself since I look like this (below) and expect the little snowflake to arrive 2-3 weeks before Christmas:


Talk about pressure! :)  But you girls know me, and I'm proud to say that I'm halfway done with my shopping already! Woohoo!

It hasn't been easy though, let me tell ya!  Shopping for someone in September can be difficult when you don't give them the gift until December and if people are anything like me...well, I've been told I'm a free spirit and it's true that I can go wherever the wind blows me... and the wind in September might not be the same in December! So while I'm crossing my fingers that my gift giving tactics are as foolproof as possible (everyone's allowed a gift flub once in a while, right? I mean, I know I've had my fair share) I thought I'd share a handy dandy list I whipped up to help me along on my gift-buying journey. 

Not ready for Christmas?  Don't worry, it's not holiday specific (though it does kinda lean towards girlier gifts), what can I say- you're at Seven Sisters, not Buncha Brothers! :)  I really tried to think of things that the gift giver would definitely use, love and enjoy. Things that you just can't have too much of...really nice colorful cloth dinner napkins are one of my secret loves as well as pretty stationary. 

The Fashionista
  1. The Trend Watcher
    •  A little black wallet or clutch
    • Warm cashmere gloves in winter or sunglasses in summer 
    • Shoes (or a gift card to their favorite shoe store)
    • Fashion magazine subscription
  2. To the beat of their own drum
    • Costume jewelry from a local boutique, etsy, or handmade
    • Handmade crocheted slippers
    • Breezy neck scarf
    • Colorful tights
    • Bright colored nailpolish
The Chef
  1. The Chocolate Lover
    • High end chocolate (duh)
    • Set of dessert plates (thrift shop!!)
    • Cupcake domes (Hobby Lobby!)
  2.  The Health Nut
The Home Decor Lover
  1. Just moved in
    • Housewarming gift bucket (small tools, nails, wood glue, etc)
    • Homemade "About the Area" book with tips and recommendations
    • Welcoming door mat
    • Plantable plant (or flowers for the apartment dweller)
    • Mrs Meyers or Method cleaning products gift basket (looove Method!)
    • Paintbrushes, rollers, and primer, oh my!
  2. Festivity lover
    • A wreath (for all those OTHER holidays)
    • Homemade heart garland for Valentines' Day
    • Handmade ornament (or search etsy)
    • Variety of sunflower seeds, wrapped in a pretty bow
    • Pumpkin carving set
    • Make your own snowman kit
    • Holiday themed tablecloth (other than Christmas)
  3. Artsy
    • Homemade abstract art/painting (or search etsy)
    • Thrift store art piece
    • Brightly colored sofa pillows
    • Hand painted birdhouse
    • Colorful/bold cloth napkins
  4. Practical
    • Pretty glass storage containers (or anything pretty for organizing)
    • Handmade blanket
    • Pretty placemat set
The Adventurer
  1. Beach lover
    • Colorful beach towel (with a favorite magazine!)
    • Name/monogram written in the sand, take a picture, frame it and give!
  2. Mountain/Nature lover
    • Cute printed rainboots
    • Bike basket (or if they already have a basket, a basket liner)
    • Picnic blanket or basket (or both!)
    • Outdoor game- think KanJam, bocce, horseshoes, etc
    • Zoo passes
    • White water rafting gift certificate
    • A really nice flashlight (in pink for your girlfriend of course)
Sentimental
  1. Your best friend
    • Letter writing kit (with all the fancy stuff!)
    • Magazine subscription
    • Pedicure or manicure date
    • Journal
    • Frame her kids' art for her!
    • Nice, colorful, WARM socks
  2. Your grandma
    • A homemade card
    • Stationary
    • Homemade baked bread, cookies, fudge, etc (you thought Grandma's liked cooking for YOU, but they like receiving too... at least in my experience :) )
    • A lunch date
    • Scan, restore, or save old photos for her
  3. Your significant other
    • WHAT HE ASKS FOR (no really...c'mon, men are simple folk).
    • A "how to pray for your wife" mini book- I've seen these on etsy, love them!
    • A love letter
    • Sporting event/concert tickets

Obviously this list isn't exhaustive, but hopefully it helps you get your creative juices flowing!  Go ahead and comment with more gift ideas too! Can always use some nifty new ones. I still have the other half of my Christmas shopping to do :) Oh, and for a lot of kid-related gift ideas, click on our "gift ideas" link on the sidebar under the "We're Organized" heading!

Monday, September 12, 2011

Back to our Roots...♥

Sometimes SevenSisters seems like a mystery...to me anyway...if i was one of you, the readers that is.
Yeah i know there's an "about us" page at the very top up there...yup...no...back...too far...THERE...yup, right there...(now read somethin' about us would ya? If ya haven't already?!) but really, truly, who are we...
Sunday we all went to the lake to spend a last lingering summer day together (lemme say, it definitely felt lingering as it poured down upon us lighting and thunder)...but more importantly to celebrate new life...of the eternal sort. 


One of our husbands, and two of our daughters wanted to be like Jesus.
Buried in the likeness of His death...


Raised in the likeness of His Resurrection.


You see, even though we're all seven very different girls...some of us are crazy (cough) some of us are level-headed, some shy, some not (cough), some of the sisters like their privacy, others want to shout from the rooftops...but of all these differences...one thing is constant:
We are daughters of The Most High...followers of a sweet Savior...sisters bonded through the Holy Spirit.  And through all the crafting, cooking, Betty Crockering and Martha Stewarting...we desire most to follow Jesus, we desire most to have people see Jesus in us. Oh, i know, sometimes...ok, a lot of times (speaking for myself here) we fail miserably, other times we trip and fall...but we get back up, in His Name we are lifted up, and we try again, we keep on trying...and I think through that love, His love, we can carry our husbands to Jesus, we can carry our children to Jesus, we can guide our friends to the One True Healer of all Souls...the One who is compassionate, gracious, slow to anger and abounding in love...
this is the glue that holds us together. 

One Life.
One Death.
One Resurrection.

This is who we are.

The Cutest DIY Kindle Cover

Ok fellow sisters...this past week was Little L's first day of kindergarten! So needless to say I have been a little preoccupied with back to school jitters!! Much more so than my little L! She was more than happy to step onto that bus and ride all the way to kindergarten all by herself! My little girl is so brave and growing up too fast! 
And so in case you were like me last week; busy with back to school. Here is a look again at the DIY tutorial for a Kindle Cover that I guest posted in the Holiday Bake, Craft and Sew Along. It is the perfect gift for that special someone in your life that loves to read and owns a kindle (Like my mother in law who keeps dropping hers. This is the perfect gift for her.) If you don't happen to own a kindle this project could easily be adjusted for whatever electronic device you own and I will explain below. 


Materials:
*Fabric (preferably two different patterns that go together)
*Matting (like the kind used in quilting)
*Elastic
*Iron on velcro
*Fabric button
*Basic sewing supplies
*Sewing machine

Getting Started
My cover is made for the Amazon Kindle with dimensions as follows:
Length x Width x Height 
7.5 in x 4.8 in x 0.335 in
I used this formula for measuring and cutting all my material
(L + H +1) x (W + H + 1)
 This formula will help you make your measurements 
whether you have this exact kindle or not. For example, you could use this formula
and make a cover for the nook or even an ipad. 
I found this formula to be extremely helpful.
After calculating and using my handy dandy formula
 (and rounding to the nearest whole number) I cut all my material as follows.

I have numbered all the pieces to make my instructions easier. 
The numbers will be used throughout the tutorial.
*Piece 1: 9 x 12.5 inches (main fabric)
*Piece 2: 9 x 12.5 inches (main fabric)
*Piece 3: 10 x 13.5 inches (matting) 
hint: you want the matting piece to be slightly larger 
than your two main pieces 1 and 2
*Piece 4: 9 x 6 inches (main fabric)
*Piece 5: 7 x 6 inches (contrasting fabric)
*Piece 6: 8 x 6 inches (contrasting fabric)
*Piece 7: 3 x 6 inches (contrasting fabric)
* Piece 8: 3 x 6 inches (contrasting fabric)
Piece 9: 3.5 x 6 inches (matting)


 To make the strap:


You only want to sew up the three edges so you can turn in right side out
with the matting in the middle. Cutting the extra fabric off the corners allows
 for your corners to look neat and square instead of bulky. 


Viola!
A beautiful strap!


 To make the inside pocket piece:


Only hem the tops of pieces 5 and 6. Leave the bottom edge untouched.


Sewing the zigzag stitch will help prevent fraying along the edges. 
Again leave the bottom edges untouched on each piece.


When you are done only the top pieces of 5 and 6 should be hemmed and 
pieces 4, 5, and 6 should have the zigzag stitch along each side edge of fabric. 
Leave the top of piece 4 untouched as well as the
bottom edge of each piece.


 Turn your pieces over so you are looking at the front of them.
You are now going to pin the three pieces together and then sew into place.
This will form two pockets for the inside of the kindle cover. 


Turn the pocket piece over again so you are looking at it from the back and
 fold in the edges with the zigzag stitch only and pin into place. 
You are only going to hem along the two side edges with the zigzag stitches.  


This is what it should look like when all the pocket pieces are sewn together.
Hemming along the zigzag stitch sews all three pieces together.  


Putting it all together:


You want the matting piece to be larger than your two main pieces because it 
makes sewing it all together easier. You can trim away excess later. 
Right now we are going to lay all the pieces on top of each other as 
follows and then sew them all together as one piece. 


Once you have placed the pocket piece on top of piece number 2 
take your number 1 piece (with wrong side facing you) and lay it on top.
 Piece number 1 should look inside out right now. Not to worry once you sew 
it all up you will turn it right side out again.  Pin along the edges described below.
 Leaving the right side edge unpinned.


Starting from the right side bottom edge start to sew a straight stitch 
around the pinned edges. Do not lift your needle out of the fabric 
during this step, until all the way around.


 Finally once you have sewn around the three pinned edges. Turn your work 
right side out. This is what it should look like. With the right side edge still open. 


 For this final step we are going to sew the right edge of the cover while sewing the strap into place and continue around the entire edge of the cover to make for a neat, stylish finish. Fold in the bottom piece of fabric and the matting and pin into place. Place your strap where you want it and pin that into place. Finally fold in the top piece of fabric and pin it all together to seal it all shut. See below.


For this last part. Just be sure to catch every piece of fabric in the "last pinned edge" so
that it all comes together neatly .
Starting at the top right corner (where you have pinned it shut). Sew a straight stitch through all the fabric all the way around the kindle cover. This will make for a neat finish and close up the last edge.


Phew: hang in there it's almost done.. and looking beautiful!


 Sewing the Elastic:


I wanted this not only to be a cover to protect the kindle but also something that could hold the kindle in place while reading it. I might as well be stylish while I'm reading right?
First I cut a piece of cardstock to the measurments of my kindle to use it as a reference. Using elastic that I measured and cut to fit around the corners. I folded in the edges of the elastic and pinned and sewed into place. They ended up working really well, and didn't even interfere with the screen. 

Finishing Touches:


Iron out any wrinkles and iron on your velcro.


TADA!!!
I can't wait to give it to my mother in law for Christmas!


A Marvelous Mess


Happy Sewing!!


:)

Related Posts with Thumbnails